FTP, an acronym for File Transfer Protocol, is a standard protocol for sharing files over the internet or a simple LAN. FTP servers have existed for over 30 years and have facilitated file sharing in a simple, yet effective manner.
Nowadays, FTP has been replaced by more secure options, such as SFTP (Secure File Transfer Protocol) and FTPS (FTP over SSL), that encrypt data sent to and from the servers. Nonetheless, it’s prudent that we appreciate the basics of installing an FTP server and see how it can be configured for simple file sharing.
In this guide, we take you through the installation and configuration of the FTP server on Windows Server 2019. There are two ways you can install the FTP server. You can use the Server Manager graphical tool, or use Windows Powershell if you enjoy working on the terminal. We will cover each of these in turn.
How to Install FTP Server using Server Manager
Server Manager is a graphical console that was introduced in Windows Server 2008. The objective was to help System Administrators easily install and manage various features and roles on the server. To install the FTP server using Server Manager, follow the steps as illustrated.
Step 1: Launch Server Manager
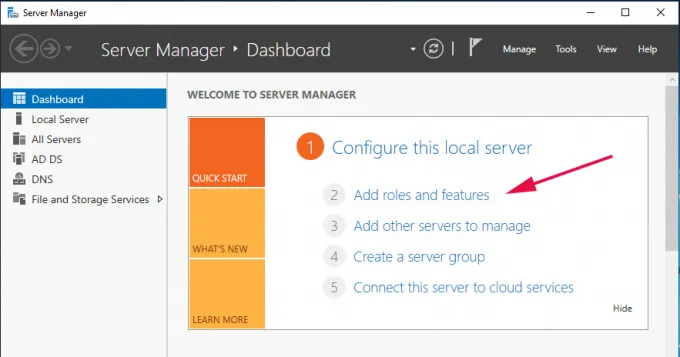
Usually, the server manager utility launches automatically upon logging in. Alternatively, you can click on the ‘Start’ menu button and select ‘Server Manager’ from the pull-up menu that appears.
Once launched, click on the ‘Add roles and features’ option as shown.
Step 2: Proceed with the installation
Clicking the ‘Add roles and features’ option launches the installation wizard. The Wizard gives you a summary of the tasks you can perform such as adding/removing roles and features. You will be required to have a few prerequisites in order before proceeding.
Once you have gone over the summary, simply click ‘Next’.
Step 3: Select the Installation Type
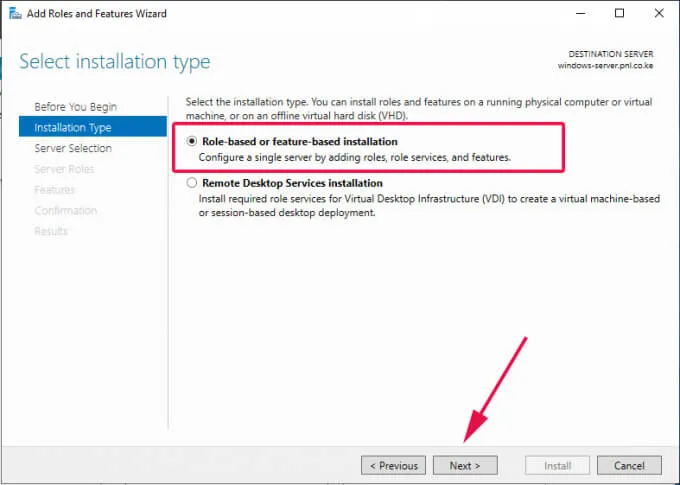
In the next step choose ‘Role-based or feature-based’ installation and click ‘Next’.
Step 4: Select the Destination Server
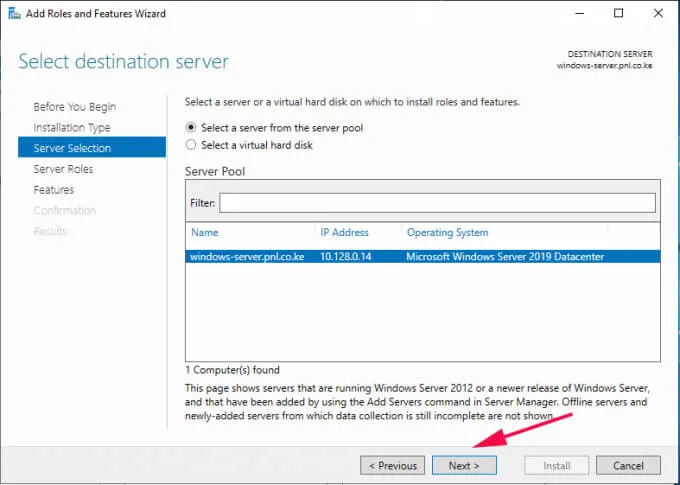
You will thereafter be required to select the server upon which you will install the roles and features. By default, the server you are working on will be selected. Just accept the defaults and hit ‘Next’.
Step 5: Select Server Roles to be Installed
In the next step, a list of server roles will be listed. Click on the ‘Web Server IIS’ option.
This launches a pop-up window that lists the roles to be installed as shown.
Click on ‘Add features’ and hit the ‘Next’ button to proceed to the next step.
Step 6: Select Server Features
Nothing much is required in this step, so once again, click on the ‘Next’ button.
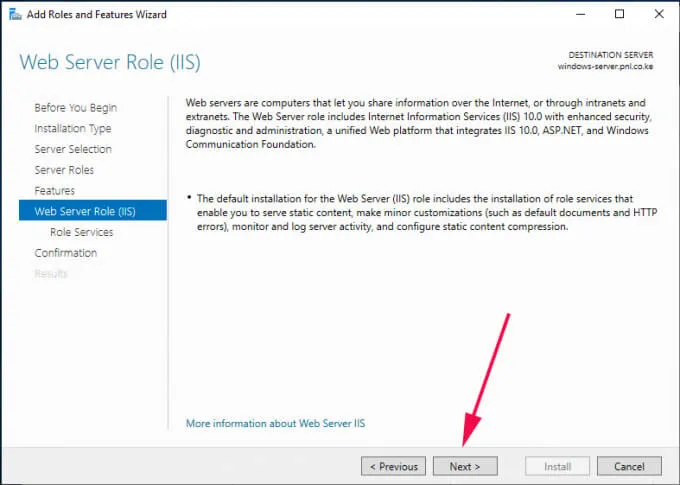
Step 7: Web IIS overview
The next step gives you a glance about what a web server is and the role it plays. So, once again, simply click ‘Next’ to proceed to the next step.
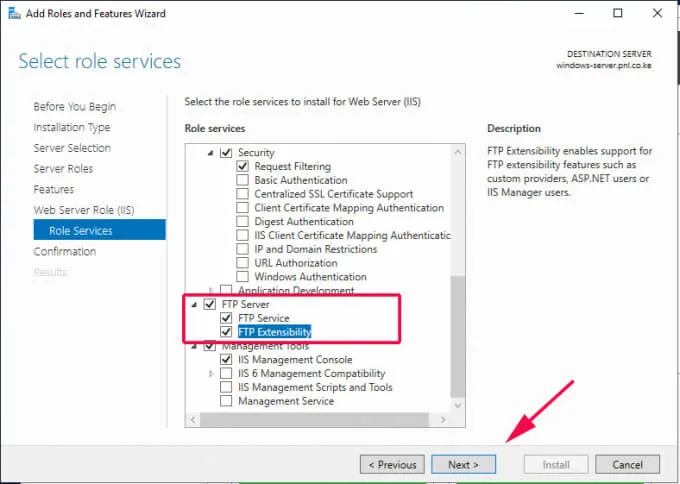
Step 8: Select Role Services
This is the quintessential step where we shall select the FTP feature. Simply scroll and check off the ‘FTP Server’ checkbox and the corresponding FTP sub-options (FTP service and FTP extensibility). Then click ‘Next’.
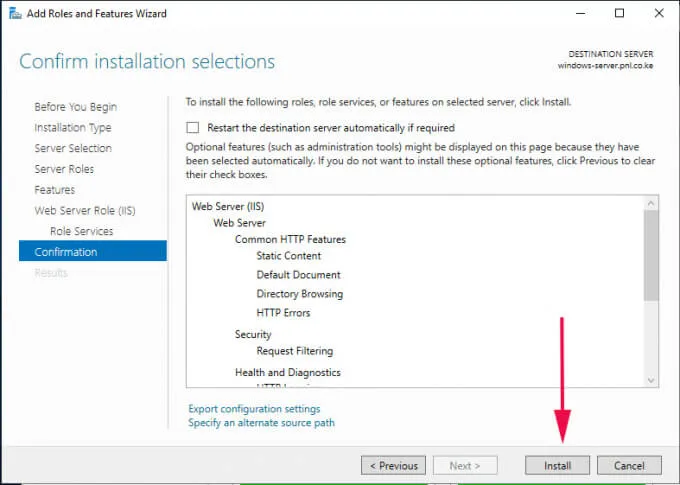
Step 9: Confirm Installation
Finally, you will be presented with a summary of the roles and features that you have selected to be installed. To confirm and initiate the installation process, click on the ‘Install’ button.
The installation will take a while, so some patience will come in handy. Once the installation is complete, reboot your server for the roles and features to be fully enabled.
As we mentioned, we can install FTP using Windows Powershell. All the steps that we have just gone through can be summarized in one single command on Windows Powershell as follows:
Install-WindowsFeature Web-FTP-Server -IncludeManagementTools
Step 10: Create and FTP directory
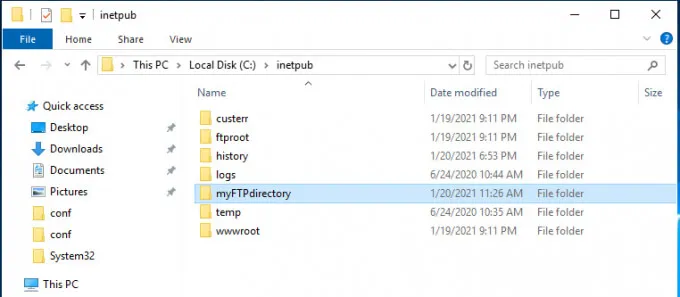
To this point, we have installed the FTP server feature on the system, and a root default directory is created to that effect. The path of the root directory is at C:\inetpub.
We are going to create a custom FTP directory where we are going to place files and directories which can be accessed by authorized users across the network.
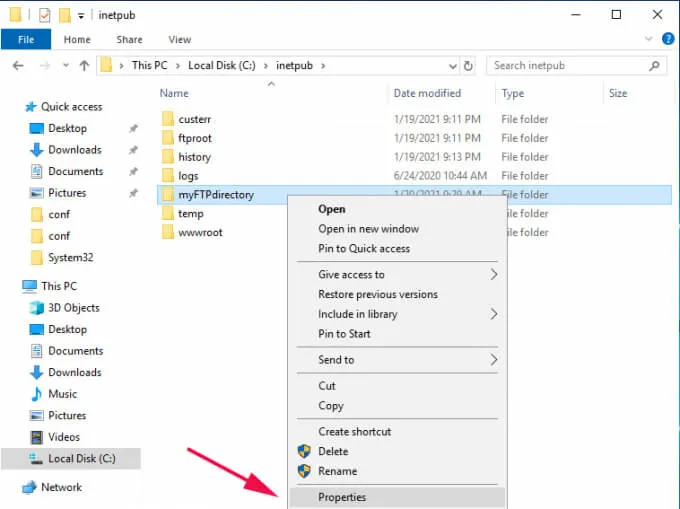
Therefore, navigate to the C:\inetpub path. Right click and select ‘New’ then ‘Folder’. Give the folder your preferred name. In this case, we have created a folder called myFTPdirectory.
We need to assign this directory the required permissions so that an authorized user can read from its contents. To achieve this, right-click on the directory and select ‘Properties’.
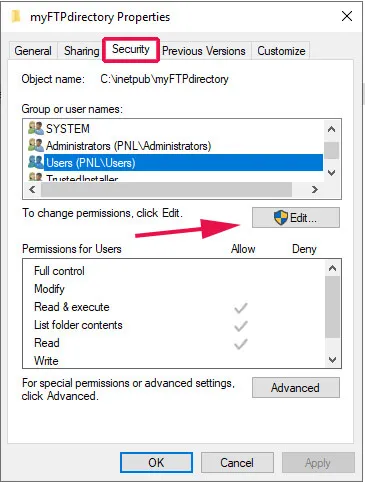
In the ‘Properties’ window pop-up, click on the ‘Security’ tab to adjust the permissions. Select the group which you want to allow access to the directory. In this case, I have selected the ‘Users’ group. Then click on the ‘Edit’ button to assign permissions to the group.
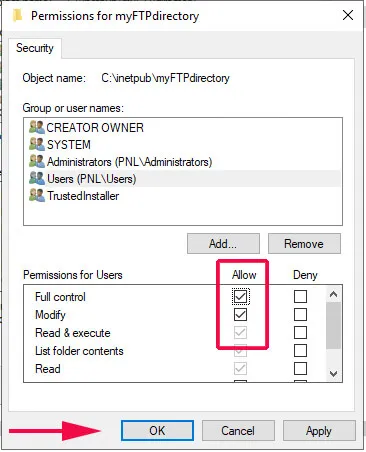
For our example, we clicked on ‘Full control’ and hit the ‘Apply’ button.
Then click ‘Ok’. This takes you back to the Properties window where, once again, you will click on the ‘Ok’ button.
Step 11: Create an FTP Site
We have assigned all permissions on our FTP directory to the Users group. The next step will be to create an FTP site which we shall map to the FTP directory.
On the Server manager, click on ‘Tools’ then select ‘Internet Services Information (IIS) Manager’ option.
On the IIS Manager window that appears, click the server name at the left pane to reveal more options. Right-click on the ‘Sites’ option and select ‘Add FTP site’.
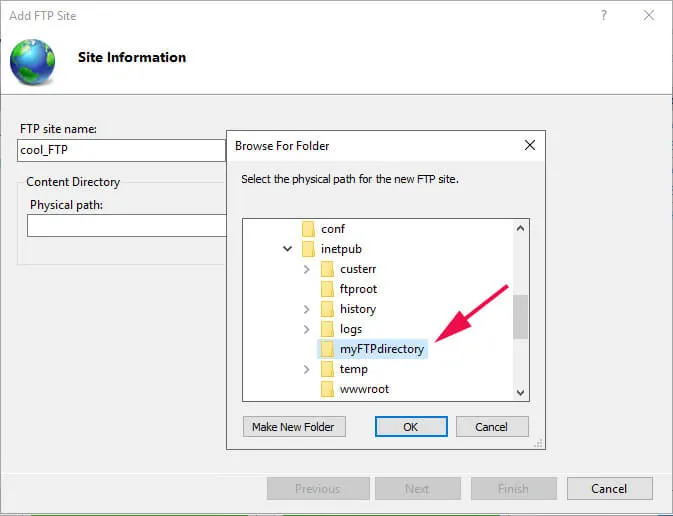
In the next step, provide the FTP site name and the Physical Path by clicking on the adjacent button with three dots and navigating to the FTP directory that we created in the previous step.
Then click ‘Ok’ then ‘Next’ to go to the next step.
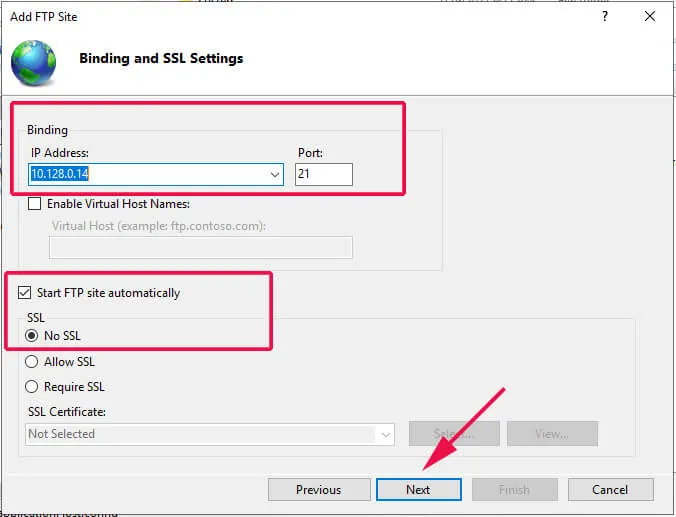
In the ‘Binding and SSL settings’ step, provide your server’s IP address, FTP port. Be sure to select the -‘No SSL’ option since we are not using an SSL certificate to secure the site.
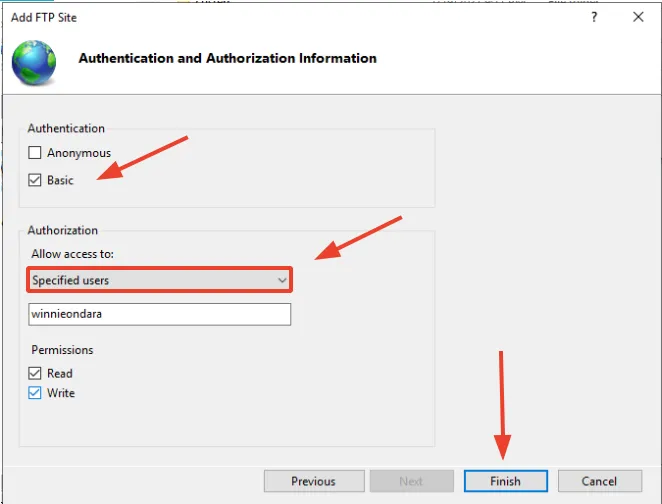
The final step requires you to select the authentication type and configure which users will have access to the FTP site. Select ‘Basic’ authentication.
Under authorization, click on the ‘Specified users’ option – if you want a single user to access the site – and right below that specify the username of the user.
Alternatively, you can allow a group of users by selecting ‘Specified roles or user groups’ and specifying the user group in the ‘text field’ provided. Then check off ‘Read’ and ‘Write’ permissions and hit ‘Finish’.
Up until this point, we have successfully configured the FTP server. The only bit remaining is to configure the firewall to allow remote users to access the FTP site.
Step 12: Configure the Firewall
FTP listens on port 21, and therefore, we need to allow this port across the firewall. To start off, click on the ‘Start’ menu button and search for ‘Firewall with Advanced security’
On the left pane, click on ‘Inbound rules’ and the head over to the extreme right and click on ‘New rule’.
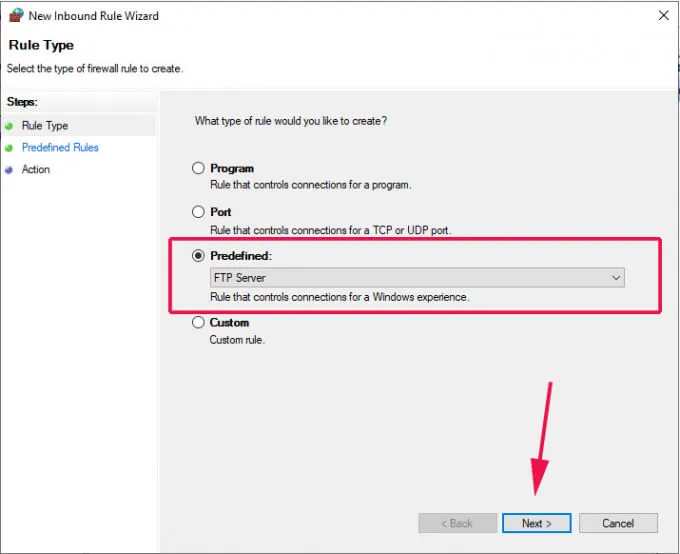
On the ‘Rule Type’ window, select the ‘Predefined’ option and select ‘FTP server’ in the drop-down menu. Click ‘Next’.
Ensure that all the firewall rules are checked off and click ‘Next’.
Finally, click on ‘Allow the connection’ and click ‘Finish’.
Our FTP server can now be accessed remotely from either a Windows or Linux/UNIX system. The only thing remaining is to test if we can make a connection to the server.
Step 13: Test FTP server
To test if your FTP server is working as expected, head over to a remote system and launch command prompt. Next, type the command below:
ftp server-ip
You will be required to authenticate, so provide your username and password.
The output above confirms that we have been able to successfully log in.
Let’s try something more ambitious. We are going to create a directory and navigate into it using the commands shown:
ftp> mkdir reports
ftp> cd reports
To verify the existence of the directory, use the ls command , just as you would in a Linux system when listing files.
ftp> ls
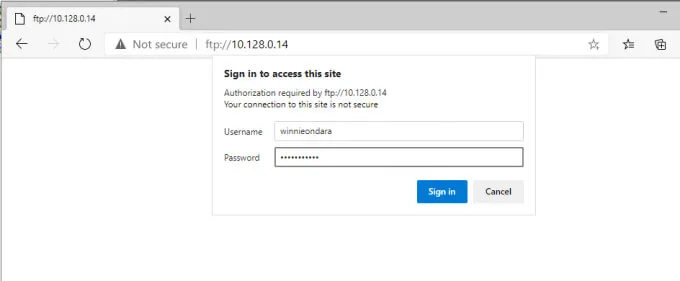
Alternatively, You can head over to your browser and head over to the URL shown:
ftp://server-ip
In the authentication pop-up, provide your username and password and click on the ‘Sign In’ button.
And voila! There goes your directory!
This confirms that our FTP server is working as expected.
Conclusion
This brings to an end our topic today. We have successfully installed and configured FTP server on Windows Server 2019. An FTP server provides a convenient way of hosting and sharing files and directories across a network to specific users or groups of users in Active directory.
However, as we pointed out earlier, FTP is now considered unsafe and extra steps are needed to secure it using an SSL certificate to keep malicious users from eavesdropping on the communication between the FTP server and the client PC. Let us know your thoughts in the comments. Enjoy!

