Hello and welcome to an introductory article on Microsoft Azure App Services. Azure App Services is a common Azure Service offering that is based on the PaaS model, or Platform-as-a-Service. What is PaaS? I’m glad you asked!
First, let’s go into some history. Initially, Azure was offering their Infrastructure-as-a-Service platform where you could build VMs in the cloud and leave out the hassle of having your own infrastructure. One day the engineers at Azure decided to use that exact same infrastructure used to host the VMs and create a new service based on that infrastructure.
Basically, they deployed a lot of IIS clusters all over the globe and created an API that gives you the option to deploy web applications in a shared environment without having to manage the infrastructure that’s hosting the service.
At first it was called Azure Web Sites, then was changed to Azure Web Apps and then several other services were added such as Logical Apps, API Apps and so forth. Finally, they decided to encompass all of those services into one offering called Azure App Service. Pretty neat huh?
Create an Azure App Service
Now that we’ve seen what the Azure App Service is, let us dive in and create a new App Service in Azure.
First, we need to login to portal.azure.com with our username and password to get to the Azure Dashboard. The Azure Dashboard is the central place where you will manage all of your services related to the Azure platform.
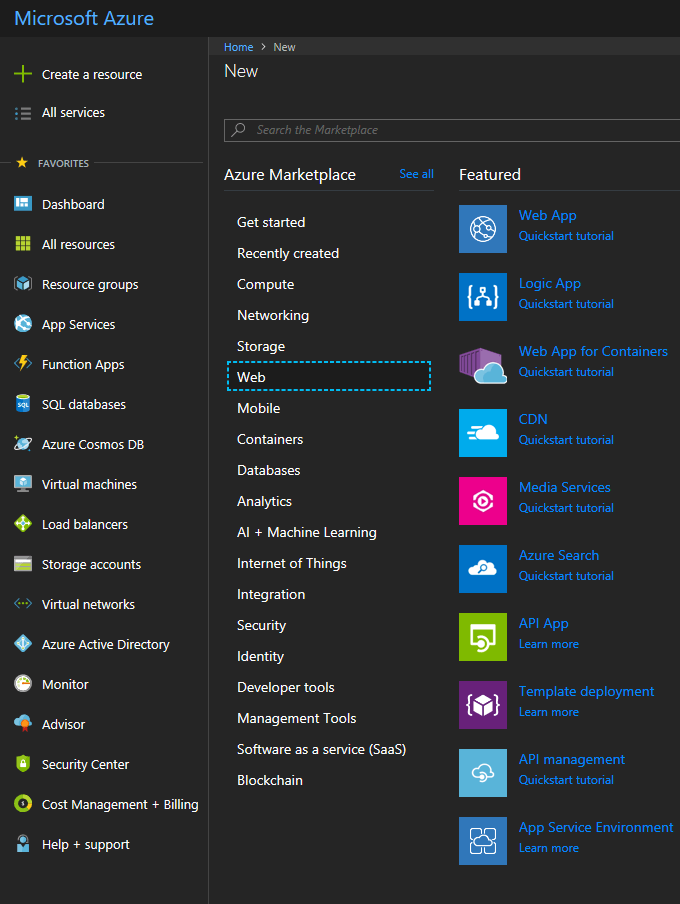
Once there, click on Create a resource, then click on Web, and finally click on Web App.
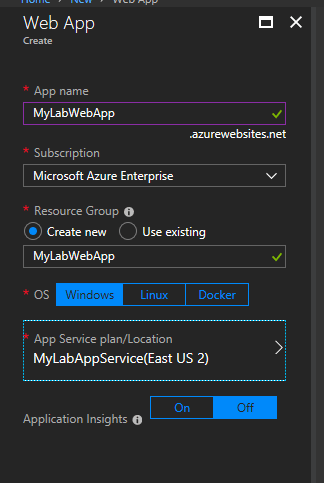
You will be greeted with a simple-to-use interface, which is mostly self-explanatory, but for the sake of getting everything right, we will go through each of the options.
The App Name is the name of your application. It needs to be unique across all the Azure platform, which means that you might get a red X in case the name you wanted is already in use.
The Subscription is one of your Azure subscriptions that are going to be used to pay for this service. In my case, it’s Microsoft Azure Enterprise subscription. In your case, it might be Pay-as-you-Go.
Under Resource Group, we have the option to choose a new one or an existing one. We will dive into Resource Groups in a later article, but for now you can leave the default options.
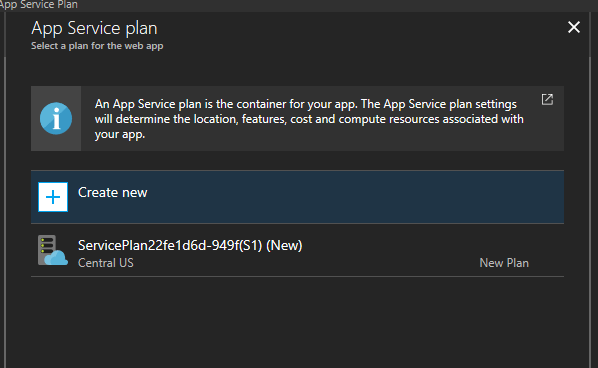
Next we have the App Service Plan. Again, we can choose to receive the default App Service Plan that gets created with the web app, that has a long convoluted name or we can create our own. I have opted to create my own, so I clicked on the App Service Plan button.
Next, click on Create new.
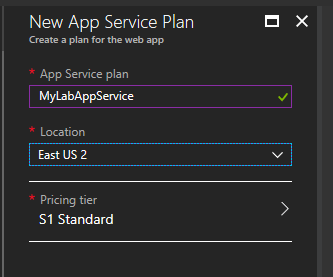
Choose a friendly name for the service plan, a location and the appropriate pricing tier. It’s best to choose the location closest to you.
Once that is done, we are directed back to the original interface and all we have to do is click Create.
That is it! It will take several minutes while your service is being deployed. Next, we will deploy a web app into this service, so we can actually see how it works.
Hope you liked this introductory article and I hope you will read the next ones to get a deep understanding of Microsoft Azure. Enjoy!


