If you work with VMware Workstation on your Windows PC, you’ve probably noticed how the virtual machine disk image can become quite large very fast, especially if you are running Windows 7 or Windows 10 as a guest OS.
Luckily, there are a couple of ways you can shrink the size of the virtual disk to a more manageable size. In this article, I’ll walk you through the different methods I use to make my virtual disks smaller.
Step 1 – Clean Up Guest OS
The first step in reducing the size of the image is to power on the virtual machine, log into the operating system and clean up anything you can there.
This means uninstalling applications you no longer need, deleting files and running disk cleanup with the option to scan system files to remove previous installations of Windows.
This step is important because you can gain significantly more space back from the virtual machine disk if it has more free space inside of it.
For example, I installed the Creator’s Update on my Windows 10 virtual machine and was able to use disk cleanup to remove 25GB of previous Windows installations. This saved me about 10 GB in space on the actual disk image file when I performed the steps below.
Step 2 – Run Disk Cleanup
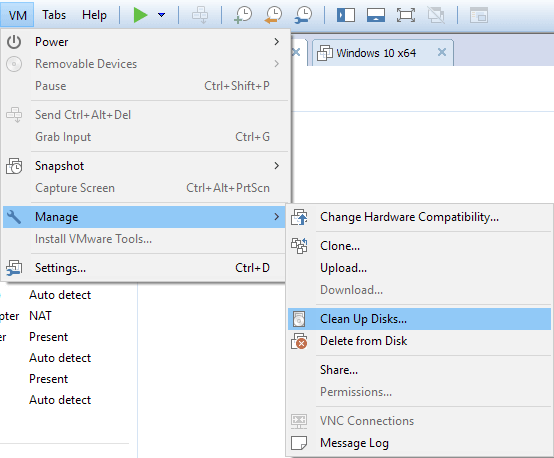
Once you have cleaned up the guest OS, you should power off the virtual machine. Next, click on VM in the menu bar, then Manage and then Clean up Disks.
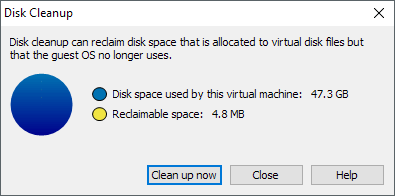
This will bring up a small dialog that will tell you how much space is reclaimable. If you haven’t done a cleanup in a while, it could be a decent amount of space.
Click the Clean up now button and let the process complete. It could take a little time the first time you run it.
Step 3 – Defragment the Virtual Disk
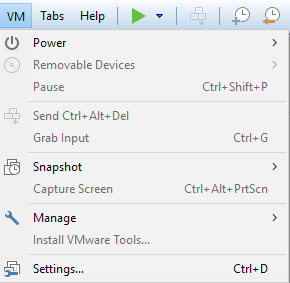
The next step is to defragment the disk, which you can do by going to VM again and then clicking on Settings instead of Manage.
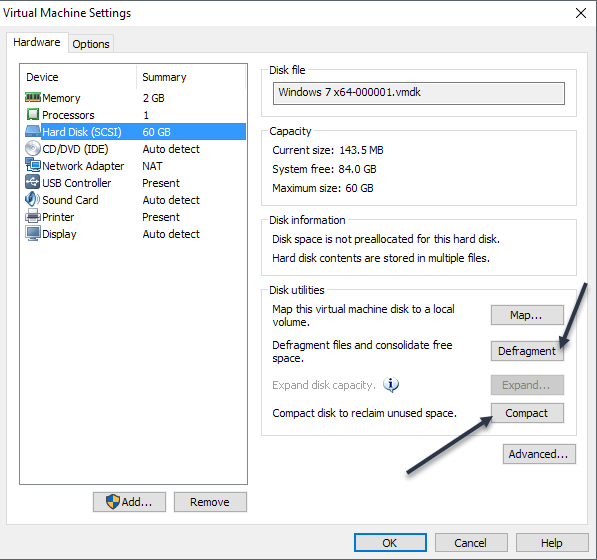
Then click on Hard Disk and you’ll see some options on the right. Firstly, you want to click on Defragment, which will consolidate all of the free space in the virtual disk image.
Next, click on Compact, which will reclaim any unused space. If you did everything up to now, hopefully you’ve gotten back at least a couple of GB’s of space.
Step 4 – Manage Snapshots
The other major space hogger is snapshots. These are great and incredibly useful, but if you don’t manage them well, they can literally become larger than the Guest OS itself.
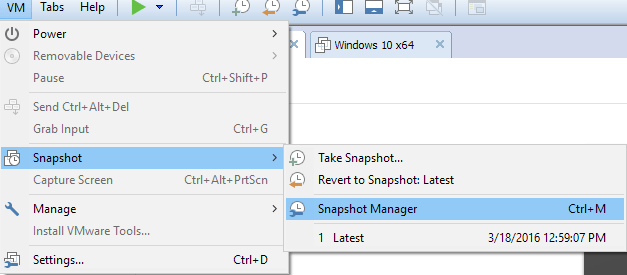
Go to VM again, then click on Snapshot and then click on Snapshot Manager. Here you’ll see a list of all the different snapshots for this particular virtual machine.
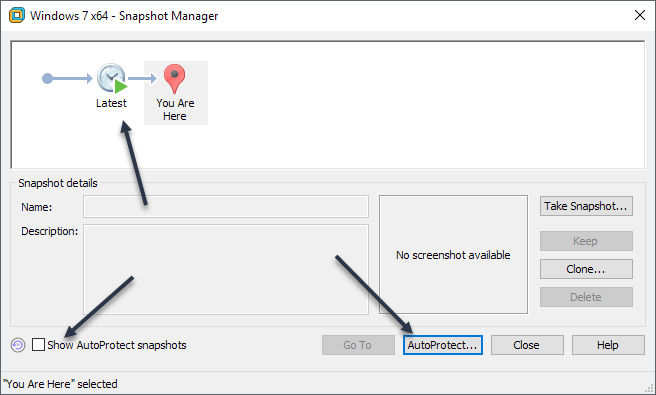
As you can see from my screenshot, I only have one snapshot called Latest. I have a smaller SSD drive, so this is how I save space. Once I install updates, etc., I create a second snapshot and then delete the older one. The less snapshots you have, the less space your virtual machine will take up.
In addition, you should check the Show AutoProtect snapshots box to see if there are any snapshots taken by VMware itself. Since I manage my own snapshots, I disable AutoProtect altogether. You can do that by clicking on the AutoProtect button and making sure the checkbox is unchecked.
Step 5 – Power Off Instead of Suspending
The last piece of advice is if you really need all the extra space you can get. When you suspend a virtual machine, it saves temp files that are several GB’s worth of data.
If you don’t use your virtual machine on a daily basis, it might be a better idea to simply power it off. This removes all the temp files and will usually free up 2 to 4 GB on your hard disk.
Note that you can follow all of these steps for each virtual machine that you have installed in VMware and therefore save even more space. If you have any ideas or tricks of your own to save space, feel free to let us know in the comments. Enjoy!


